Header

Clutch kit Specials

The street clutch kit is perfect for the daily driver with mild performance upgrades. The street clutch kit is of OE quality and will give you long lasting performance. Anytime you are replacing the clutch be sure to have the flywheel turned by a machine shop to have trouble free performance. One of the most common clutch failures we see on a new clutch install is the mounting of the pressure plate to the flywheel with a uneven tightening sequence. Be sure to tighten the pressure plate bolts evenly as per directions.

Buy Today To Save Today
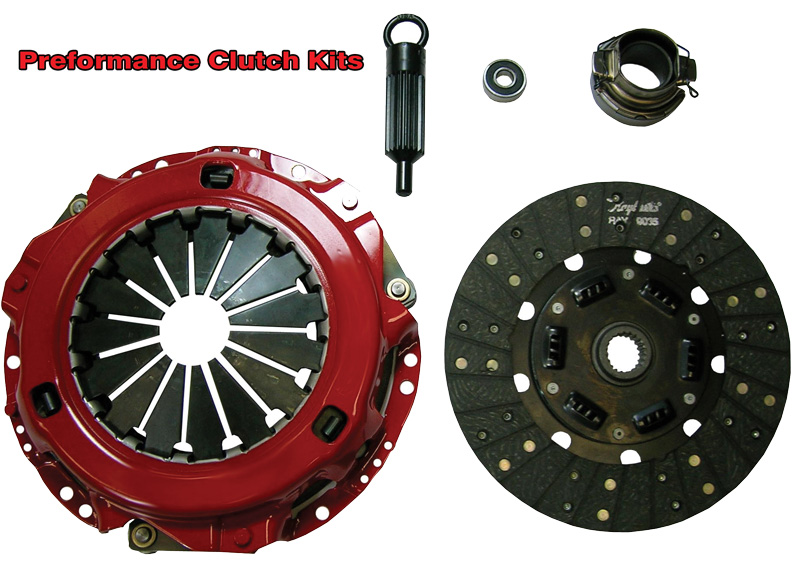
Clutch kit

1053066 Street Clutch Kit 22R/RE 1981-1988
1053069 Street Clutch Kit 22R/RE 1989-1995 2wd or 89-92 4wd

1053117 Street Clutch Kit 22R/RE 1993-1995 4wd

1053067 Street Clutch Kit 22RET 1986-1988
1053120 Street Clutch Kit 2RZ 1995-2004

1053028  Street Clutch Kit 3RZ 1995-2004

1053125 Street Clutch Kit 3VZ 1988-1995

1053027 Street Clutch Kit 5VZ 1995-2004
Save 10% on Toyota Clutch Kits

The LCE Pro Clutch Kit

The pro clutch kit is recommended for the modified vehicle with more performance than stock. With a higher clamping force pressure plate and American made organic disk this clutch kit will out preform the stock equipment. A definite upgrade for those pushing there vehicles further than intended. Pulling heavy loads or using tires over the recommended stock size you will be able to appreciate the quality components of the pro clutch kits as well as the increased performance these kit will offer.

High Performance Clutch Kits Toyota

1053039 Pro Clutch Kit 20R(75-80) (8 7/8")
1053078 Pro Clutch Kit 22R/RE(93-95 4wd) (9 1/4")
Save With LCE
1053042 Pro Clutch Kit 22R/RE(81-88) (8 7/8")

1053072 Pro Clutch Kit 22RET(86-88) (9 1/4")

1053045 Pro Clutch Kit 22R/RE(89-95 2wd or 89-92 4wd)

1053081 Pro Clutch Kit 2RZ(95-04) (9 1/4")

1053031 Pro Clutch Kit 3RZ(95-04) (10")

1053075 Pro Clutch Kit 3VZ(87-95) (91/4")

1053030 Pro Clutch Kit 5VZ(95-04) (10")
1053080 Pro Clutch Kit 1ZZ (00-05)

1053084 Pro Clutch Kit 2TR 2005-2011 10"

Wideband AFR

Here is the kit that started it all! This kit has evolved over time to become the best selling air fuel ratio kits that we sell. PLX Wideband AFR gauge combo combines an accurate, fast response wideband AFR (Air/Fuel Ratio) controller with the world's most advanced touch screen 2 1/16" gauge. The wideband controller works with gasoline, biodiesel, ethanol, methanol, E85, LPG, and CNG. It includes two analog outputs wideband 0-5V, and narrowband 0-1V for interfacing with 3rd party devices and one digital serial output for interfacing with the DM-6 gauge and other Multi Gauges. The wideband analog output is ideal for interfacing with aftermarket ECU's and data loggers. The narrowband output is ideal for stock narrowband oxygen sensor replacement where the simulated narrowband analog output is fed back into your ECU to make it operate as if the stock narrowband oxygen sensor is still installed while running the PLX wideband setup. All three outputs can be used simultaneously. Additional features include advanced soft start technology which prolongs the oxygen sensor's life and an aluminum enclosure for durability and reliability.

1099066  PLX DM-6 + SM-AFR Wideband AFR Combo $189.99

PLX Wideband AFR

Weber Carb Kits


Special Prices on Toyota

1030021 Weber 32/36 Carburetor Kit - 20R/22R
1030032 Weber 32/36 Carburetor Kit With Manual Choke 20R/22R

1030030 Weber 38 Carburetor Kit - 20R/22R
1030034 Weber 38 Carburetor Kit With Manual Choke 20R/22R

Save 10% Frome LC Engineering

These parts are recommended if you are replacing an existing Weber carburetor. Due to labor cost today sometimes its just less expensive to replace rather than repair that's why we sell the carburetor only. If you are going for a replacement for the stock carburetor we highly recommend using the complete kits shown above for trouble free installation. These Carburetors comes alone so LCE recommends the following accessories for a successful install for existing or new carburetor installation. We off the carburetor only in both electric and manual choke versions 32/36 and Weber 38. High elevation buyers should pick up a high elevation jet kit as the carburetors are good from sea level to 2000 feet.

Tech Department

Installing a timing chain in 22R/RE

One of the most common parts we sell is the timing chain kits. We like to use the OSK timing chain kits as they are the OE supplier to Toyota. Due to the number of bolts that need to be removed in order to complete the task , some find it a little daunting. The job of changing the timing chain is one that Toyota recommends be done at 80,000 miles. Some of forums say 90,000 to 100,000 miles or as long as it will go. The "as long as it will go", spells expensive troubles down the road. The LCE recommended Timing chain replacement is 80,000 miles for plastic guides single row and 100,0000 with the upgraded metal backed guides. For the dual row timing chains, replacement should be done at 140,000 miles. Below we have the short version of the steps for timing chain replacement. Always refer to your Haynes, Chilton or Factory Service Manual for comprehensive instructions.

Tools Required
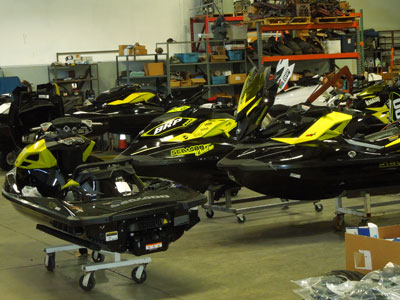
  • Socket wrench set
  • Gear puller for crankshaft pulley
  • Gear puller for crankshaft sprocket

  • 1. Disconnect the alternator and oil pan with a socket wrench. Remove the cooling fan with the water pump still attached. Disconnect the securing bolt for the crankshaft pulley and pull the crankshaft pulley from the crankshaft with a suitable gear puller.

  • 2. Detach the water bypass hose to access the timing chain cover. Disconnect the adjusting bar for the cooling fan belt with a socket wrench. Remove the water outlet pipe for the heater.

  • 3. Remove the mounting bolts for the timing chain cover with a socket wrench, and detach the cover. Separate the timing chain from the crankshaft damper. Remove the timing chain and camshaft sprocket from the camshaft. Remove the crankshaft sprocket and oil pump drive from the crankshaft with a suitable gear puller.

  • 4. Turn the crankshaft clockwise with a wrench until the crankshaft key aligns with the timing mark on the crankcase. Align the key way on the crankshaft sprocket with the key on the crankshaft and mount the sprocket to the crankshaft.  

  • 5. Mount the new timing chain to the crankshaft sprocket so that the single bright link on the chain aligns with the timing mark on the crankshaft sprocket. Mount the timing chain to the camshaft sprocket so that the timing mark on the sprocket is between the pair of bright links on the timing chain.

  • 6. Place the drive spline for the oil pump over the key on the crankshaft and mount the gasket for the timing chain cover to the front of the engine block.Be sure to apply a good amount of ultra gray sealer were the timing cove meets the block and head. Turn the camshaft sprocket counterclockwise with a wrench to take up the slack on the timing chain.  

  • 7. Replace the cover for the timing chain. Tighten the 8-mm mounting bolts to 9 foot-pounds with a torque wrench and tighten the 10-mm bolts to 29 foot-pounds. Apply a thin layer of gasket sealer to the gaskets for the oil pan and timing chain cover.

  • 8. Connect the adjusting bar for the cooling fan belt, and tighten its mounting bolts to 9 foot-pounds with a torque wrench. Attach the water outlet pipe for the heater and the water bypass pipe.

  • 9. Mount the crankshaft pulley to the crankshaft and tighten its mounting bolt with a socket wrench. Attach the water pump and air conditioning compressor. Connect the oil pan and alternator.

Toyota 22RE Timing Cover Bolts And Torque
Click The Picture To Enlarge

Jet Ski Racing Is Going Off At LCE

Every year the LC Engineering shop fills up with jet skis for the the IJSBA World Finials that are held in our hometown of Lake Havasu City, Arizona. We are the destination for jet ski racers from all across the world. This year is no different as we host teams from Australia, New Zealand, South Africa, Thailand, United Kingdom and the United States. Sea Doo and Hydro Space jet skis getting prepped for World Finals racing in the LCE shop. We go though hundreds of gallons of the VP race fuel. Most of the LCE employees will be at the race site for the next couple of weeks.

World Finals 2012 LC engineering Sea Doo CenterWorld Finals 2012 LC engineering Sea Doo Center Unloading

World Finals 2012 LC engineering Sea Doo Center ShopWorld Finals 2012 LC engineering Sea Doo Center Jet Skis

World Finals 2012 LC engineering Sea Doo Center Race FuelJames Bushell


LCE Footer Shop today at LCEPERFORMANCE lce power you tube LC ENGINEERING FACEBOOK PAGE

LC Engineering 2031 Holly Avenue Lake Havasu City AZ 86403

Sales 877-505-2501 Tech 928-855-6341